| Orig. Posting Date | User Name | Edit Date |
| Mar 8, 2023 03:23PM | Kermy | |
| Feb 21, 2023 04:46AM | RedRiley | |
| Feb 9, 2023 06:51PM | RogerOtto | |
| Nov 20, 2022 07:07PM | mark01 | |
| Sep 11, 2022 08:00AM | Dentonf | |
| Sep 7, 2022 09:16AM | CJLazer | |
| Aug 12, 2022 07:45AM | Willie_B | Edited: Aug 12, 2022 07:47AM |
| Aug 4, 2022 07:14AM | robster | |
| Aug 1, 2022 07:37AM | elpez | |
| Jun 13, 2022 08:44AM | onetim | |
| May 1, 2022 11:54AM | AJPA | |
| Apr 2, 2022 06:29PM | robster | |
| Feb 16, 2022 12:35PM | Dan Moffet | |
| Feb 10, 2022 08:16PM | Sherismini | Edited: Feb 10, 2022 08:52PM |
| Jan 6, 2022 01:36PM | XRayActual | |
| Nov 14, 2021 03:50PM | vespa400 | |
| Sep 28, 2021 04:02AM | 6464s | Edited: Sep 28, 2021 04:33AM |
| Sep 27, 2021 06:17AM | Skeete | |
| Sep 24, 2021 05:07AM | 6464s | Edited: Sep 24, 2021 05:24AM |
| Sep 7, 2021 04:00AM | onetim | Edited: Sep 7, 2021 04:01AM |

|
Total posts: 333
Last post: Apr 13, 2024 Member since:Jan 22, 2018
|
Cars in Garage: 0
Photos: 0 WorkBench Posts: 0 |
Bought some Hella H4 headlights then installed LED bulbs and then decided for LED's all around, except in my non-stock, but cool, repeater lights. I had to buy an LED compatible flasher. Interestingly, my existing flasher would operate the rear LED signal lights but not both the front and rear. The right front signal/running light socket was badly rusted but fortunately I had a spare in my parts inventory.
|
|
Total posts: 2100
Last post: Oct 22, 2023 Member since:May 1, 2007
|
Cars in Garage: 1
Photos: 220 WorkBench Posts: 0 |
|
After having hard starts, intermittent non-starting and weird electrical gremlins for a long time on Kreacher, my VTEC Elf, I dug into the issue. Checked and rechecked all the grounds, and replaced the old nasty engine ground with a nice new mil-spec braided ground strap. Nope. Starter seemed iffy even after pulling it and bench testing it, so I put a new reconditioned one in. Still same issues. I pulled the original-ish ignition switch (it's one with the aux position) and it basically fell apart in my hands and had very worn out contacts. So I put a brand new one in, using my old key tumbler. Still the same problems. I also added a push-button start switch into the empty choke hole in my switch panel just for fun. Final test was to jump the battery directly to the starter. Fired right up! So pulled all the battery cables out and found two places where the (possibly original to the car) long positive cable was pinched between the body and the subframes. New cables made and installed and viola, no more starting issues! That was tough, but I won in the end. Kreacher should be good to go now. I recommend Custom Battery Cables in Mesa, AZ if you need any custom length cables professionally made. Nice quality stuff.
|
|
Total posts: 256
Last post: Aug 26, 2023 Member since:Nov 26, 2017
|
Cars in Garage: 0
Photos: 0 WorkBench Posts: 0 |
Painting wheels. I had the wrong hubcaps on which scrapped lots of paint off.
if they do not turn out OK I will then send to have power coated.
if they do not turn out OK I will then send to have power coated.
Roger Williams
1966 Austin Cooper S
LHD, WET, Personal Export
1966 Austin Cooper S
LHD, WET, Personal Export
|
|
Total posts: 1359
Last post: Apr 19, 2024 Member since:Dec 9, 2000
|
Cars in Garage: 0
Photos: 0 WorkBench Posts: 0 |
|
I checked the fluid levels and all were fine. The antifreeze is good for -35 degrees. I then hooked up the trickle charger to the battery. I did the same to my 2012 FIAT 500 Lounge, so all is good.
|
|
Total posts: 4
Last post: Sep 30, 2022 Member since:Aug 28, 2022
|
Cars in Garage: 0
Photos: 0 WorkBench Posts: 0 |
Hello- How much oil did you use for the oil change? I am having trouble finding out how many quarts? I have seen 4.5 to 5.5..
|
|
Total posts: 3
Last post: Sep 4, 2023 Member since:Sep 7, 2022
|
Cars in Garage: 0
Photos: 0 WorkBench Posts: 0 |
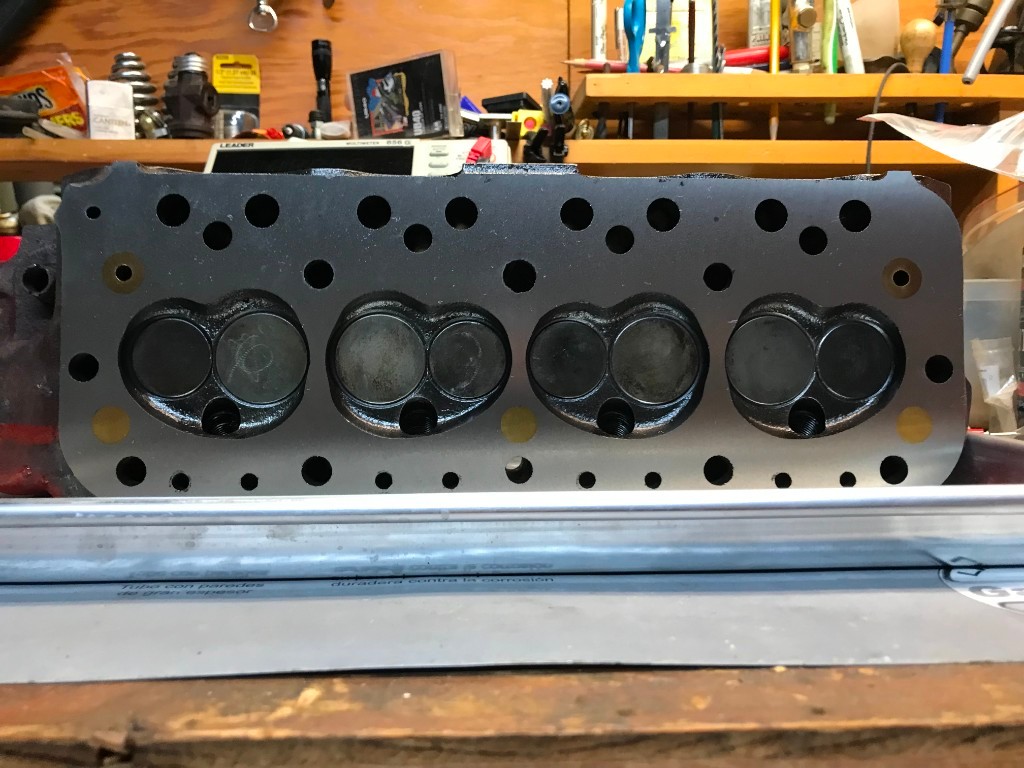
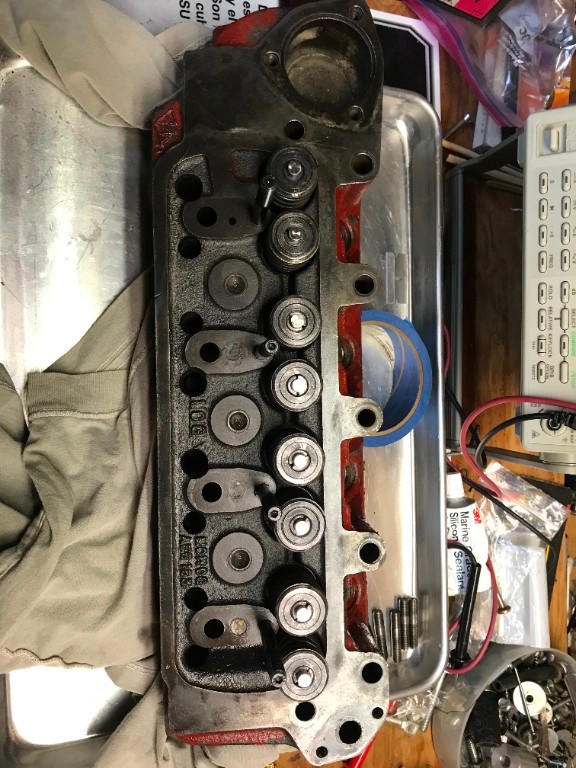
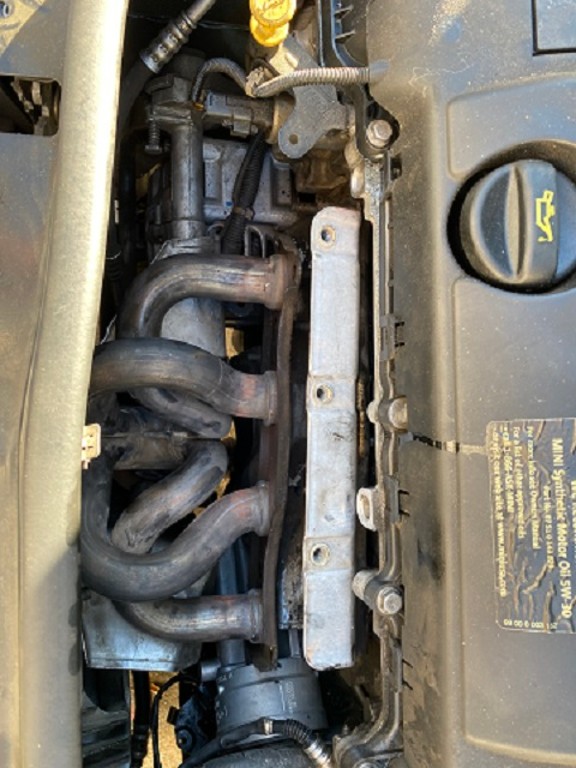
 I installed electronic ignition and it started for the firts time in 20 years!!!! carburator rebuild and fuel system next
|
|
Total posts: 2524
Last post: Apr 18, 2024 Member since:Dec 1, 2002
|
Cars in Garage: 0
Photos: 0 WorkBench Posts: 0 |
|
 Got it on the road. Now to see what leaks, loosens or falls off.
"How can anything bigger be mini?"
|
|
Total posts: 598
Last post: Dec 29, 2023 Member since:Sep 6, 2014
|
Cars in Garage: 0
Photos: 0 WorkBench Posts: 0 |
nothing lately, it's already perfect in my eyes.
|
|
Total posts: 877
Last post: Apr 1, 2024 Member since:Dec 12, 2004
|
Cars in Garage: 0
Photos: 0 WorkBench Posts: 0 |
|
Took the cover off and drove it to Big Pine Key for a dentist appointment, 35 miles, drove it back and covered it up, the sun is brutal here!
|
|
Total posts: 1007
Last post: Jul 19, 2022 Member since:Jul 24, 2014
|
Cars in Garage: 0
Photos: 0 WorkBench Posts: 0 |
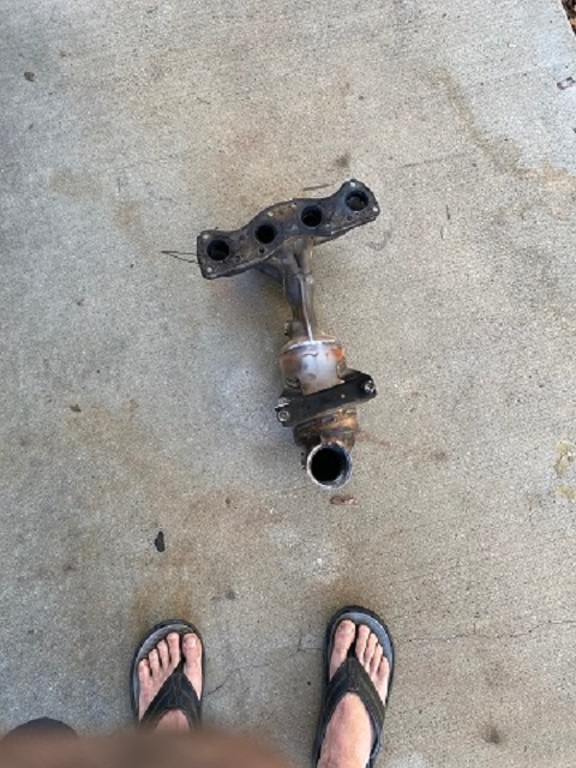
Replaced a leaking slave cylinder along with a new flex line, got it all shifty again, out of storage, and into the big world.
|
|
Total posts: 8
Last post: Apr 26, 2023 Member since:Apr 30, 2022
|
Cars in Garage: 0
Photos: 0 WorkBench Posts: 0 |
Phew I suppose the week turned into months for me. Pulled rear subframe and repainted. Rebuilt trailing arms. Replaced 1 handbrake cable (MK 1). Repacked rear wheel bearings. Converted from single line to dual line braking system mostly due to an exciting time I had at an autocross and then drove home with the handbrake! Made up new brake lines for that assembly. Finally (I hope) replaced old worn squashed front cone springs with good new old stock - car sits at least 2" higher in the front!
|
|
Total posts: 598
Last post: Dec 29, 2023 Member since:Sep 6, 2014
|
Cars in Garage: 0
Photos: 0 WorkBench Posts: 0 |
Well, i painted the bonnet black.
|
|
Total posts: 9542
Last post: Apr 18, 2024 Member since:Aug 14, 2002
|
Cars in Garage: 0
Photos: 0 WorkBench Posts: 0 |
|
Dreamed about driving it.... sigh!
.
"Hang on a minute lads....I've got a great idea."
|
|
Total posts: 1
Last post: Feb 10, 2022 Member since:Feb 10, 2022
|
Cars in Garage: 0
Photos: 0 WorkBench Posts: 0 |
Image Gallery
|
|
Total posts: 85
Last post: Jan 26, 2022 Member since:Mar 27, 2019
|
Cars in Garage: 0
Photos: 0 WorkBench Posts: 0 |
military and some motorcycle manufacturers (harley) used 5.1 because it stores better as it's not as water attracting. However, when it is contaminated with water, it's much worse than dot 3/4 as it's performance is drastically worse
Quote:
Quote:
Originally Posted by 6464s
Skeeter, I'm afraid you have gotten your facts about DOT 4 and silicone based brake fluid mixed up. DOT 4 has a higher wet and dry boiling point than DOT 3. Brake fluids of any DOT # should not be mixed.
DOT 5.1 is silicone based and has 30% glycol. DOT 3, DOT4, & DOT 5.1 are all hygroscopic meaning they attract water. These fluids should be changed as part of a maintenance program.
I have been using DOT 5 in my daily driver mini for decades and never had a failure in the rear wheel cylinders or the master cylinder. The rear wheel cylinders are the first to fail by attracting water and rusting. This is because water is heavier than brake fluid and the rear cylinders are the lowest point. I also use DOT 5 in my clutch hydraulic system without a problem. DOT 5 does not attract water.
People certainly have opinions about using DOT 5, some swear by it, others dislike it.
![]()
Xavier, Sales/tech - 800-46-2642
|
|
Total posts:
Last post: Nov 14, 2021 Member since:Apr 7, 2000
|
Cars in Garage: 0
Photos: 1 WorkBench Posts: 0 |
|
took it for one last drive before winter, filled it with premium gas and put it in the corner of the garage until next year
|
|
Total posts: 501
Last post: Apr 19, 2024 Member since:Jan 25, 2017
|
Cars in Garage: 0
Photos: 0 WorkBench Posts: 0 |
Skeeter, I'm afraid you have gotten your facts about DOT 4 and silicone based brake fluid mixed up. DOT 4 has a higher wet and dry boiling point than DOT 3. Brake fluids of any DOT # should not be mixed.
DOT 5.1 is silicone based and has 30% glycol. DOT 3, DOT4, & DOT 5.1 are all hygroscopic meaning they attract water. These fluids should be changed as part of a maintenance program.
I have been using DOT 5 in my daily driver mini for decades and never had a failure in the rear wheel cylinders or the master cylinder. The rear wheel cylinders are the first to fail by attracting water and rusting. This is because water is heavier than brake fluid and the rear cylinders are the lowest point. I also use DOT 5 in my clutch hydraulic system without a problem. DOT 5 does not attract water.
People certainly have opinions about using DOT 5, some swear by it, others dislike it.
DOT 5.1 is silicone based and has 30% glycol. DOT 3, DOT4, & DOT 5.1 are all hygroscopic meaning they attract water. These fluids should be changed as part of a maintenance program.
I have been using DOT 5 in my daily driver mini for decades and never had a failure in the rear wheel cylinders or the master cylinder. The rear wheel cylinders are the first to fail by attracting water and rusting. This is because water is heavier than brake fluid and the rear cylinders are the lowest point. I also use DOT 5 in my clutch hydraulic system without a problem. DOT 5 does not attract water.
People certainly have opinions about using DOT 5, some swear by it, others dislike it.
|
|
Total posts: 13
Last post: Sep 27, 2021 Member since:Nov 30, 2020
|
Cars in Garage: 0
Photos: 0 WorkBench Posts: 0 |
Installed a new Brake Master Cylinder and fully bled the brakes. Has made a significant difference to the feel of the pedal.
The old Master Cylinder started leaking fluid down onto the carpet. When I bought the car I had a local garage give it a quick once over and they bled the brakes, so I think they used Silicone based DOT4 which has eaten through all of the seals.
Thats the last time I trust a garage with anything.
The old Master Cylinder started leaking fluid down onto the carpet. When I bought the car I had a local garage give it a quick once over and they bled the brakes, so I think they used Silicone based DOT4 which has eaten through all of the seals.
Thats the last time I trust a garage with anything.
|
|
Total posts: 501
Last post: Apr 19, 2024 Member since:Jan 25, 2017
|
Cars in Garage: 0
Photos: 0 WorkBench Posts: 0 |
Weeks turned into 8 1/2 months when I started derusting the under side of my mini. I cut out the rusted bits back to good metal, replaced with the same gauge stainless steel patch panels and welded in place. Rust was in every inside and outside corner (I have a small box and pan brake
to make these panels). Creating weep holes and reopening the sealed plugs replacing them with rubber plugs. Grinding, wire wheeling, dremeling and scraping all the welds and the factory undercoating, to hand brushing a two part epoxy primer and then a two part epoxy top coat. I finalized the derusting process by having some rattle cans made up with the original color to color match for the parts that show. One last thing, I sprayed fluid film into the rocker panel boxes. Now I'm moving to the corners of the engine bay. I did all this without taking my mini off the road - My rolling restoration. I'm very pleased with the outcome. To be continued...
to make these panels). Creating weep holes and reopening the sealed plugs replacing them with rubber plugs. Grinding, wire wheeling, dremeling and scraping all the welds and the factory undercoating, to hand brushing a two part epoxy primer and then a two part epoxy top coat. I finalized the derusting process by having some rattle cans made up with the original color to color match for the parts that show. One last thing, I sprayed fluid film into the rocker panel boxes. Now I'm moving to the corners of the engine bay. I did all this without taking my mini off the road - My rolling restoration. I'm very pleased with the outcome. To be continued...
|
|
Total posts: 1007
Last post: Jul 19, 2022 Member since:Jul 24, 2014
|
Cars in Garage: 0
Photos: 0 WorkBench Posts: 0 |
Image Gallery