Supplemental Information & Instructions for
C34770A Voltage Stabilizer, Negative Ground
13H3554 Voltage Stabilizer, Positive Ground
A Little History
Many British cars produced through the mid 1960s have moving-iron gauges that are fed directly from the battery through a wire that is live when the ignition is switched on. Fuel gauges of this type have two characteristics: The needle jumps off empty as soon as the ignition is switched on, and the needle bounces all over the place when you hit a bump. The readings on these gauges are also affected by the battery voltage, which means they may be erratic or inaccurate as the voltage varies. The new gauges introduced by Smiths in the 60s were based on bimetallic heating elements, and they eliminated these problems. These gauges behave differently; the needles of the fuel or temperature gauge drift up off the lowest reading slowly when the ignition is turned on. The new gauges required the addition of a voltage stabilizer.
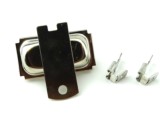
The original Smiths voltage stabilizer is simply a mechanical voltage regulator that takes battery voltage (13.8 -14V) and reduces it to 10 volts. Inside the stabilizer is a bimetallic strip, an insulated heating wire coil, and contact points. Over time, they fail for a variety of reasons and repairing them is problematic. The Smiths voltage stabilizer came in many configurations - the type and number of terminals depended upon the application, but that all perform the exact same function, providing the gauges a steady 10V.

About the Voltage Stabilizer
Let’s make sure that is the problem, using the gas gauge to diagnose the problem.
Before you do any testing:
- Locate the stabilizer. Consult your workshop manual for the location.
- Remove the wires from the stabilizer, marking them clearly so you can connect them correctly later.
- Remove the stabilizer and clean all the electrical connections, including the ground connection - the points of contact between the mounting tab and the body sheet metal.
- Reinstall the stabilizer, and reconnect the wires.
- Using a voltmeter, measure the voltage at the battery (this is the battery voltage referred to below)
With ½ tank, Gauge Reads High
- Remove the wire(s) from the “I” terminal
- Connect a volt meter between the “I” terminal and a good clean ground on the chassis.
- Turn on the ignition.
- If the voltmeter shows
-
- the same voltage as you measured in step 1, AND
- it remains there for 20-30 seconds without changing, it is probable that the points inside the stabilizer are not opening and you should replace it.
- Make sure the wire(s) are properly connected to the sending unit.
- Verify that there is adequate fuel in the tank.
- Disconnect the wire on the sending unit that goes to the gauge (usually green-black).
- Switch on the ignition and touch the sending unit wire to a good clean ground - the needle should rise slowly to the full position. If it does, the sending unit or the sending unit ground is suspect and needs to be checked out.
- If the gauge still reads low, the stabilizer output voltage is low and you should replace it.
With ½ tank, Gauge Reads Empty
- Remove the wires from the stabilizer, marking them clearly so you can connect them correctly later.
- Locate the wires that were connected to the “B” terminal
- Connect a volt meter between the “B” wires and a clean ground on the body sheetmetal.
- Switch on the ignition and observe the volt meter reading and compare it to the battery voltage.
- If the voltage at the “B” wire is less than battery voltage, the wire connected to “B” is damaged or broken and that must be found and corrected.
- If the voltage at the “B” wire is the same as battery voltage, switch off the ignition.
- Measure the resistance of each of the “I” terminal wires from end to end. Resistance over a few Ohms indicates a problem in the wire that must be corrected.
- If no problems are found with the wires and the gauge still reads empty, reconnect the voltage stabilizer.
- Perform the “Gauge Reads Low” series of tests listed above.
Installation Tips
- Verify that the polarity of the stabilizer you have matches to polarity of the vehicle.
- Locate the original stabilizer. Consult your workshop manual for the location if necessary.
- Remove the wires from the stabilizer, marking them “B” and “I” so you can connect them correctly later.
- Clean the electrical connectors on the wires.
- Remove the original stabilizer, and clean the ground connection on the body sheet metal.
- Install the new stabilizer in the original location, and secure it with the original screw and washer.
- Connect the wires marked “B” to the “B” terminal. Connect the wires marked “I” to the “I” terminal.