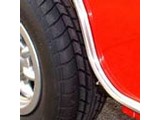
The dreaded job of installing the plastic trim! Here are the steps we used during our latest install on a 1969 S to achieve great results:
Tools: Two people, Heat gun, drill & bit ( 1/8th size), rivet gun & aluminum rivets (1/8th short-reach size), trim cutters or utility knife, touch-up paint & small paint brush, 2” wide masking tape, straight pick, smooth handled screwdriver, carpet or cardboard for the floor. Beverage of choice standing by for your toast to a job well done, or to drown your sorrows! Note: don’t bother using a hairdryer: it does not get hot enough.
A note on temperature: Ambient temperature will affect the workability of the trim. It is best if the air temperature is over 65F. Try to get the car out of the wind, as any airflow will cause the trim to loose heat rapidly and reduce your chances of installing it without kinks.
Photos are included below.
Process:
- Remove your watch and any rings on your fingers! Rings will cause you to dent the trim as you try to squeeze it on the car, and you want to remove your watch so that you don’t get frustrated at how much time this takes!
- Raise the car up on jack stands. If your tires are on the car, remove them for easier access while drilling & riveting.
- Measure the gap on the vertical seam covers all around. Make sure you have enough room to install the plastic trim underneath it. We used a small piece of trim and place it in each opening to make sure of the fit.
- Place carpet or cardboard on the floor beside the car. This will prevent your trim from becoming damaged or scratched when it touches the floor.
- Clean the area along the edge where the trim will sit. Touch up any bare spots to prevent rust from forming. Also remove any road tar or other debris, as any imperfections will be visible on the lower seam edge (deluxe trim is clear plastic on the underside).
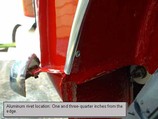
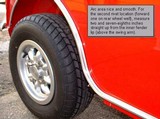
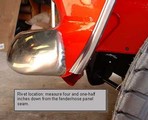
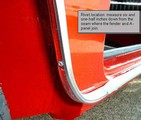
- If you have installed new fenders or other body panels, or are installing the trim on a car that didn’t have it originally, pre-drill a rivet hole at the front and rear of each wheel well opening. Touch up the bare metal around the drill hole with paint to prevent rust. If you have the standard trim (non-deluxe), you may wish to save this step until you have installed the trim on the car. Since the standard trim is not clear on the lower edge, you may have difficulty lining up the holes in the trim with the pre-drilled ones. Just take care not to drill right through the upper side of the trim if you do it all in one step! See the pictures for measurements.
- Take the roll of molding and tape a large piece of masking tape over one end. Even with two people, chances are good that at some point during the process it will come in contact with the car body and scratch the paint! Most of the time the trim is about a foot longer than you need, and you won’t have to remove the tape.
- Take the heat gun and warm up the trim in one-foot sections, easing the twist by forcing it straight. Work your way down the entire length. It won’t be perfectly straight, and will retain some twist. The metal portion in the trim has memory, and wants to return to the “rolled” state. Don’t try to get it perfect, just ease out some of the twist. We fount that doing this made the trim less likely to twist up in the corner sections, and easier to install down the length of the car.
- We started at the rear of the car and worked forward. With the heat gun, again warm up a one-foot section of the trim. Be careful not to scorch the paint on the car body. Bend it to approximate shape for the wheel well section, including the bottom area of the wheel well. The arc at the lower portion of the fender opening is the tightest radius, and the trim is a bit easier to manipulate off the car. Once you have a basic shape (it will be far from exact), again warm up the first one foot to six inches of trim. Once it is good and hot, quickly press it onto the body edge. Hold the section you have installed until it is cool. If all looks well, apply a strip of masking tape to hold it in place. Once you have the first half of the wheel well done, you can either use masking tape to hold it in place as you move along the car, or you can install the first rivet. Just remember that if you choose to rivet now, you cannot make adjustments! We chose to just use the masking tape, since we wanted to make sure the position was correct.
- When you come to the first wheel well arc, heat up the trim up about six inches forward of the bend to soften the kink. Then go back to the curve area and only try to do at most a four-inch section. It will have to be hot to take the bend, and the tricky part is getting the trim on without twisting or kinking it. You may have to pull off a small bit of the trim from the section you just completed, and heat it up slightly. If you find that it isn’t quite to your liking, you can pull it off and re-heat it for another try. Just use caution that you don’t burn your paint on the car, or overheat the trim. Again, once you have it on the car, hold it in position for about a minute letting the trim cool. If you do this correctly, it will be hard to pull off when it is cold.
- The straight section between the wheel wells is much less difficult. You may be tempted to just press it in place without any heating, however we found that the heat not only made the trim slip on better, it also adhered more strongly and was less likely to pull off.
- Again, when you come to the next wheel well arc, the trim should be thoroughly heated. By this point there should be less twist, but you will still have to heat in small sections and hold it in place while it cools.
- We ended the trim just below the lower edge of the front bumper, and cut it at an angle for a more finished look. It is a matter of personal preference where to end the trim. Again, see pictures for the measurements we used.
- If you have not done the riveting as you went along, go back now and install them. Using the drill, carefully make a hole in the plastic trim. Be very careful not to go too far, as the bit could go right through the trim on the other side! Note that you may have to take the heat gun and a blunt screwdriver handle, and heat up and press the bottom of the trim a little to flatten it out. We found that the lower portion of the trim didn’t sit flush in places, but a bit of heat and pressure made it reasonably well fitting. It is a good idea to heat up the trim again a bit, as this makes the rivet head less prone to marking the trim from the inside. Also, if you do mark it as you install the rivet, a little heat and slight pressure will lessen the mark in the trim.
- Well, now on to the next side!


